Z-Tech Head & Neck Restraint Setup Instructions
Model: Series 1A - SFI 38.1 Certified
For video instructions, click here.
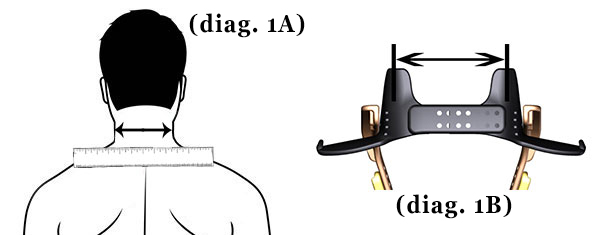
Step 1– Adjust the shoulder width adjustment
You will want to measure the width of your neck (diag. 1-A). The Series 1A has a neck width that ranges from 4.75 to 7.75 inches. Upon establishing that measurement, you will want to adjust your shoulder adjustment (diag. 1-B) to 1 inch wider than your neck measurement. Remove 4 screws and binary posts and set to correct position. If you will be adjusting wider than the setting out of the box, you may need to loosen the straps, video instructions here
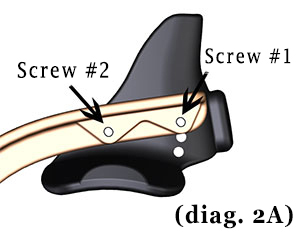
Step 2- Adjust the UPPER ARM Angle
It is recommended that you adjust this in your race seat to get the best angle for your individual needs. There are two screws on each side(diag. 2-A ). Screw #1 is the only screw that needs to be removed to adjust angle. Screw #2 does not need to be removed and it has thread lock on it from mfg. Remove Screw #1, and adjust the arm angle so that fits snug against body, but does not protrude into your body. Adjust both sides to same angle.
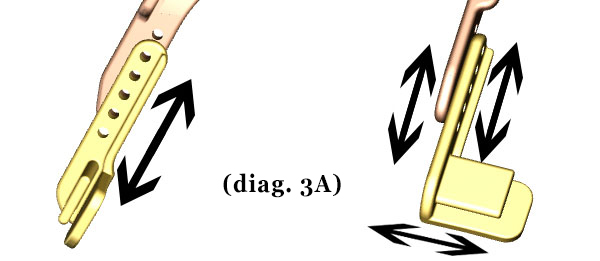
Step 3- Adjust the LOWER ARM Length
It is recommended that you adjust this in your race seat to get the best length for your individual needs. There are two screws on each side (diag. 3-A ). Remove both Screws. Adjust to a length that comfortably fits on your chest and in a position that allows the buckle from seat belts to tighten securely. The lower arm can be mounted inside or outside the upper arm.
Upon completion of steps 1-3, once you are 100% happy with the fit of your restraint, we recommend that at this time your remove all screws one at a time (except screw #2 in step 2) and secure them with tread lock “blue” and tighten snug.
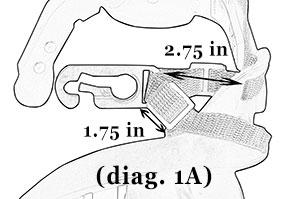
Step 4- Adjust tethers and strapping
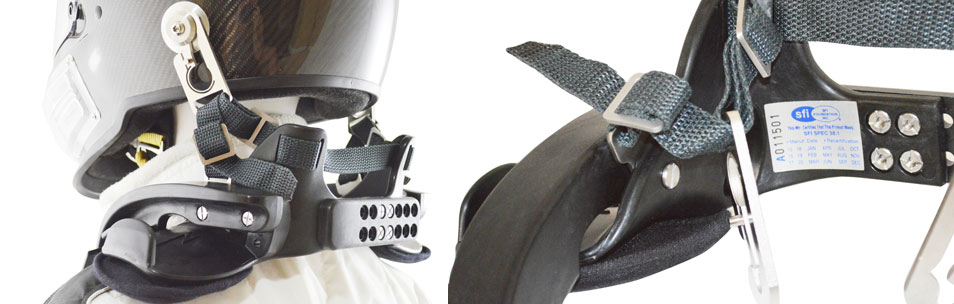
It is recommended that you evaluate the video here in regards to adjustment of tethers and strapping. You will want to make sure the strapping stays in the same configuration throughout the hardware as you receive it from the mfg. There are two points which you will want to adjust (diag. 4-A). Point #1 should be adjusted to 2.75 inches (70mm) and Point #2 should be adjusted to approx. 1.75 inches (45mm).
Step 5- Setting Up Helmet
Installation of Z-Tech hardware will depend on if your helmet has a certified M6 Insert or a Predrilled. Helmet inserts that are not certified are not recommended.
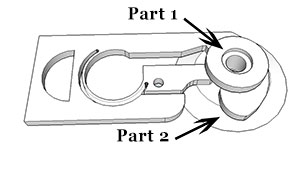
M6 Inserts– Set Part #2 against helmet shell centered to the insert. Then put the M6 Screw provided through Part #1 with thread lock “blue” on the end of the screw. Align Part #1 and M6 Screw through Part #2 and carefully screw the M6 insert into the helmet without cross threading during installation. Tighten snuggly and allow thread lock to dry.
Predrilled– You will first need to install Z-Tech nut washer Part #3 on the interior of the shell. Slide Part #3 between the Shell and EPS/Dense foam upper liner, carefully positioning it center to the predrilled hole. Once Part #3 is positioned correctly, then you can move on. Set Part #2 against helmet shell centered to the insert. Then put the M6 Screw provided through Part #1 with thread lock “blue” on the end of the screw. Align Part #1 and M6 Screw through Part #2 and carefully screw the M6 insert into the helmet without cross threading during installation. Tighten snuggly and allow thread lock to dry.
Click here for video instructions
Click here to return to Z-Tech main page